Search for answers or browse our knowledge base.
How to mirror the WordPress activity log to AWS CloudWatch (Amazon)
The WP Activity Log plugin can be configured to mirror the activity log of your WordPress website(s) to AWS Cloudwatch by Amazon, so you can centralize all of your website(s) logs with all the other logs of your network. The WordPress activity log is mirrored to third party services in real time, so you can see what is happening on your site in real time directly from your third party service of choice.
This document explains how you can mirror the activity logs of your WordPress website(s) to AWS CloudWatch. In short, the process consists of the following steps:
- Create an access key for your IAM User on AWS
- Set up an AWS CloudWatch connection in the WP Activity Log plugin
- Configure the mirroring of the activity log to CloudWatch
1. Create an access key for your IAM User on AWS
For the plugin to be able to send logs to AWS CloudWatch you will need an access key. In this section we explain how you can create one, assuming you have access to create one and you hace access to AWS CloudWatch. Please note that the below is a basic explanation. For more detailed information about AWS CloudWatch refer to the service’s documentation.

- Login to your AWS portal.
- Select My Security Credentials from your account’s drop down menu in the top right corner.
- Click the Create access key button.
- When prompted click the Download .csv file and click Close.
IMPORTANT: The CSV file contains the Access Key ID and the Secret access key. Store this file / details in a secure location because you will not be able to access the Secret access key again from the AWS interface.
2. Create an AWS CloudWatch connection in the plugin
To setup an AWS CloudWatch connection in the activity log plugin:
- Click on the Integrations node in the plugin menu.
- Click the Create a Connection button to launch the connection setup wizard.
- Select AWS CloudWatch from the Type of Connection drop down menu in the first step of the wizard.
- When the plugin completes the requirements test, click Next.

- In the third step of the wizard, in which you configure the AWS CloudWatch connection, you have to specify the following:
- Region – Select the region where the logs should be stored
- AWS Key – Enter the AWS key as available in the downloaded CSV file
- AWS Secret – Enter the AWS secret as available in the downloaded CSV file
- AWS Session Token – This is an optional field in which you can enter an AWS session token
- Log group name – Enter the log group name that you would like to use on AWS CloudWarch
- Stream – Stream and Log Stream name options vary depending on whether you’re running a single-site or multi-site setup.
On a single site, you just have to specify the Log Stream name. On a multisite network, you’ll find the following options:
- Mirror the activity logs of all subsites on the network to one steam – If you have a multi-site setup you can choose to mirror activity logs from different subsites to one stream by checking the radio button.
- Log stream name – Enter the log stream name that you would like to use.
- Create a Stream for every individual subsite on the network – If you have a multi-site setup, you can enable this option to create separate streams for every subsite. You can choose to name the stream according to Sitename as configured in WordPress or by its FQDN (Fully Qualified Domain Name). Tick the appropriate radio button.
- Retention – this is the number of days that the logs should be kept on AWS CloudWatch. You can change this setting later from the settings or from the AWS CloudWatch interface.
- Specify a name for the connection. The connection name is the friendly name that is used in the plugin. They can be up to 25 characters long and can only consist of letters, numbers and underscores.
- Click Save Connection to close the wizard.
Testing the AWS CloudWatch Connection
Once the connection is setup it will be listed in the Connections tab. Click the Test button to send a test message to the configured service via the plugin and confirm the configuration.

3. Configuring the mirroring of the activity log to AWS CloudWatch
Once the AWS CloudWatch connection has been configured and tested, configure the mirroring by following the below instructions:
- Click on the Integrations node in the plugin menu.
- Navigate to the Mirroring tab and click the Setup an Activity Log Mirror button.

- In the first step of the wizard specify the following:
- Friendly name for the mirror.
- Mirror identifier in logs (this will be added to each even, so you know the source of the activity log event).
- Select the AWS CloudWatch connection you’ve just setup from the Connection drop down menu.
- In the second step of the wizard specify if you want the mirroring to start right away.
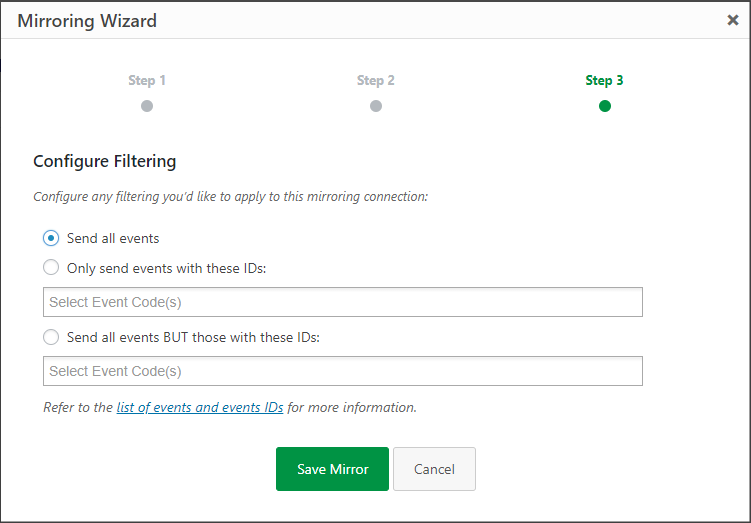
- In the last step of the wizard you can configure activity log filtering rules for the mirroring connection. By default, the connection is set to Send all events option, though if you’d like to setup any filtering rules refer to configuring filtering rules for activity log mirroring connections.
- Click Save mirror to save the new mirroring process.
WordPress activity log in your AWS CloudWatch
That is it. Now the plugin will send a copy of the activity log events to your AWS CloudWatch log group / instance as they happen, in real time!

Restrict log writing to mirror only
Once the mirroring setup process is complete, and WP Activity Log has successfully started writing to AWS Cloudwatch, you will have the option to stop writing activity logs to the database. While this will help you prevent redundant data, do keep in mind that the plugin will only write activity logs to the configured mirror(s).
To stop writing activity logs to the database, switch off the Write activity log to database option as available in the Mirroring tab.

Configuring the correct AWS IAM permissions
When you configure the plugin to mirror the WordPress activity log to CloudWatch on AWS, you need to configure the right permissions. During the first connection the plugin needs to create a Log Group and a Log Stream. Therefore you need to allow the following:
- logs:CreateLogGroup
- logs:CreateLogStream
- logs:DescribeLogGroups
- logs:DescribeLogStreams
- logs:PutLogEvents
- logs:GetLogEvents
- logs:FilterLogEvents
Once everything has been created and the plugin is successfully writing activity log events to the CloudWatch group and stream, you can limit the IAM permissions to just the below:
- logs:DescribeLogGroups
- logs:DescribeLogStreams
- logs:PutLogEvents
More information & other Integrations
Refer to getting started mirroring the WordPress activity log for more information on the format of the logs, the third party services the plugin can mirror activity logs to and other technical details.